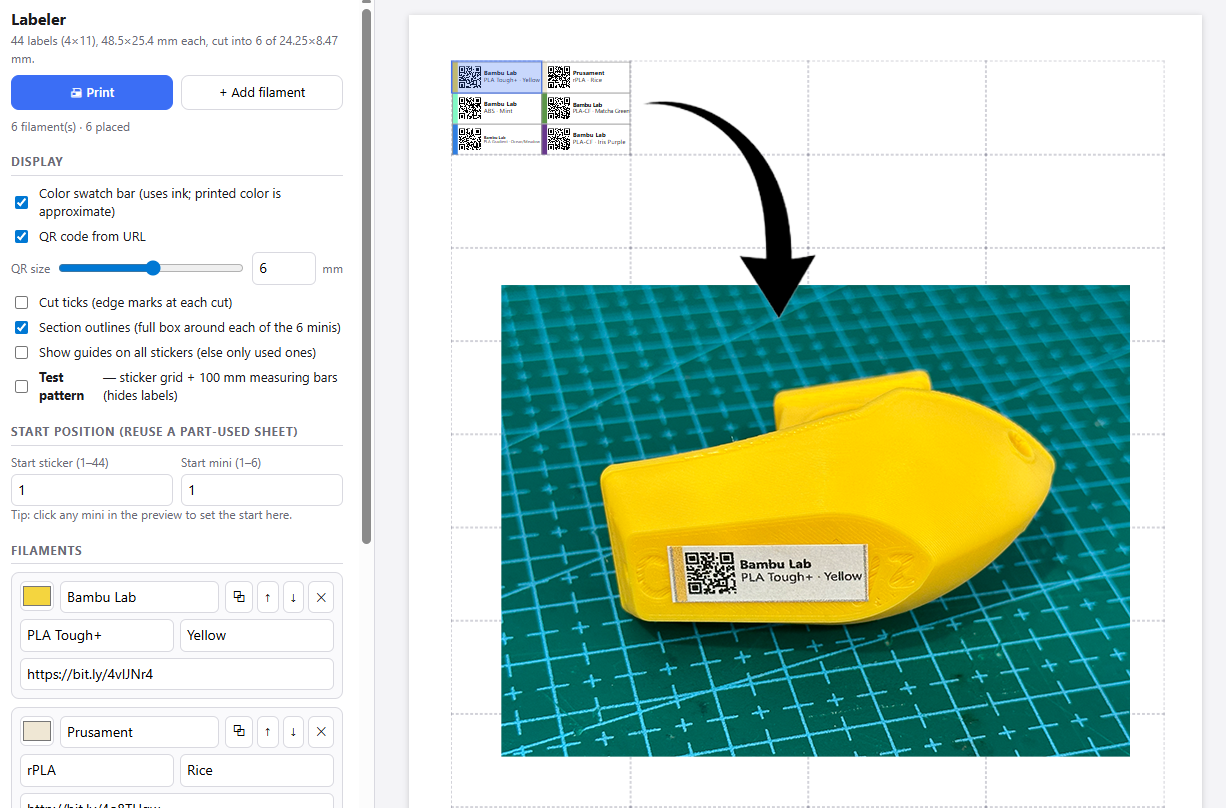
Prints tiny filament labels onto precut A4 sticker paper, sized to stick on the bottom of a 3DBenchy so you always know which filament each one was printed in.
Warning
You need a high resolution printer for the small text (long filament names) and especially the QR codes. The mini labels end up around 24 x 8 mm and a QR has to fit in a corner of that. I print on an 600DPI inkjet (Epson L6370) and even that can just about manage ~6 mm QR codes pointing at bit.ly short links, honestly impressive for ink, but it is right at the limit. On a weaker printer the QR codes may not scan and tiny text can smear. Keep names short, shorten the URLs, and always do a test print before committing a real sticker sheet.
This is purpose built for the underside of a Benchy, but it can be adjusted to almost any size*. I print a Benchy in every filament I own and then immediately forget which is which, so this makes a sheet of little labels to put on each hull. The sticker paper I have is precut into stickers that are far too big for a Benchy, so the app slices each sticker into 6 mini labels with printed cut guides.
It is a vibecoded tool meant for my personal use, but the geometry is fully configurable, so it works on any precut A4 sheet if you want to repurpose it. Everything runs in the browser with no install and no internet. Your filament library is saved locally and can be exported or imported as JSON.
Visit here: https://assets.thefilip.com/labeler
Labels
- A filament library where each row is one mini label: brand, material, color name, a color swatch, and an URL.
- Duplicate button on each row, so two filaments that differ only by color take seconds to add.
- Reorder, delete, and add rows. Order decides the fill order on the sheet.
- Optional printed color swatch bar drawn from each filament's color.
- Optional QR code from the row URL, with an adjustable size slider (3.5 to 8.4 mm).
- Text auto-shrinks to fit the tiny label.
Cutting guides
- Each sticker splits into 6 minis: 3 horizontal stripes plus one vertical cut down the middle.
- Cut ticks: short marks at each cut on the sticker edges, so the label face stays clean.
- Section outlines: a full thin box around each of the 6 minis, if you prefer following a line.
- Ticks and section outlines toggle independently, on used stickers only or on every sticker.
Reusing a part used sheet
- You usually print only a handful at a time. Pick a start position (or click a mini in the preview) and labels fill in reading order from there.
- Unused stickers stay blank, so you can feed the same precut sheet again later and continue from the next free spot.
Calibration and any sheet size
- A test pattern with 100 mm measuring bars and a full sticker grid for checking print scale and registration.
- Offset X/Y nudging plus a scale compensation field to cancel printer drift or borderless zoom.
- Advanced sheet geometry (columns, rows, label size, margins, gaps) so it fits any precut A4 sheet. The on screen summary always reflects your current geometry.
Data
- Library, options, and calibration are saved automatically in the browser.
- Export and import the whole setup as JSON to back it up or move it to another machine.
- Open it in a browser, CHROME is the most reliable in my testing.
- Build your filament library: brand, material, color name, color swatch, and an optional URL for a QR.
- Turn on the display options you want (color bar, QR, cut ticks, section outlines).
- Pick a start position if you are reusing a part used sheet.
- Print. In the dialog choose Actual size or 100% scale and turn Fit to page OFF. Paper is A4.
- Cut each sticker into 6 along the printed guides and stick them on your Benchies.
- Turn on Test pattern, then print on plain paper at 100% with Fit to page OFF. Use minimum margins but NOT borderless. Borderless zooms the page by roughly 3 percent and cannot register to a precut sheet. A normal fixed printer margin is fine as long as it is smaller than your sticker margin.
- Check scale: measure a 100 mm bar end to end (there is one horizontal and one vertical). If it reads 100 mm the scale is correct. If not, type the measured value into Measured 100 mm bar in the Calibration section, which pre shrinks or pre grows everything around the page center to cancel the error. Reprint and measure again.
- Check registration: hold the printout over your real sticker sheet against a window or light. Each printed box should sit on a precut sticker, and the corner marks should frame the grid.
- If it is shifted, nudge Offset X and Offset Y in millimeters and reprint until it lines up.
When alignment is good, turn Test pattern off and print real labels using the same offset and scale.
Note: the offset field is in millimeters, not centimeters. A move of 0.5 mm is a real correction; 0.05 mm is basically invisible. Trust me, I tried.
- Keep filament names short and URLs shortened (a link shortener works well) so text and QR codes stay legible at this size.
- The 6 way cut is fixed (half width by thirds height), but the label size is not, so it adapts to whatever sheet you configure.
- Currently fixed to A4 page size. The label layout is free, the page is not.